Toe Up Sock Pattern & Invisible Double Sided Cast On Instructions


My husband flapped around the house on Saturday night crowing about how his hand knit socks had warmed his feet during a long rainy day at the Soap Box Derby. The car his business sponsored won the Super Stock race, and will be going to Akron, Ohio for the final. Wool socks in June, you ask? It was 55 F and rainy -- typical June weather here in coastal Alaska. My original pattern follows. Bearfoot from Mountain Colors is my favorite sock yarn. It is lightweight enought to wear inside loafers, and although it is mostly superwash wool it doesn't have that "what fiber is this?' superwash feel -- it is a wool/mohair/nylon blend.
Basic Crew Sock Pattern II ©
Two Circulars, Toe Up, Heel Flap, 2x2 Rib
Materials: Mountain Colors Bearfoot, two 24” circular needles in size 3 for first two sizes, Lorna's Laces sock yarn for the third size.
Sizes: Unisex M, L, L
CAST ON
Using two circular needles, CO 32 (36, 40) st using invisible double sided cast on. You should have 16 (18,20) st on each needle. Do not worry if your cast on stitches are loose, because they are easily tightened up before you sew in your ends. Photos & a step by step guide to the invisible 2x cast on appear at the end of this post.
BEGIN TOE
ROW 1: Move the second needle to the rest position (with the stitches on the cable rather than on one of the needles). With both ends of the first needle, K 16 (18, 20). Return first needle to rest position. Turn work. Repeat on second needle.
ROW 2: K 32 (36, 40).
PLEASE NOTE: Unless directions say otherwise, a row is all the stitches on BOTH needles.
ROW 3 & EVERY ODD ROW: K1, M1, K until you have one stitch left on LH (left hand) needle to knit, M1, K1. Return first needle to rest position. Turn work. Repeat on second needle.
ROW 4 & EVERY EVEN ROW: Knit all stitches.
Continue these two rows until you have 64 (72, 80) total st (or desired # of stitches -- total # of stitches must be divisible by 4). Try the toe on to judge fit.
BEGIN FOOT
ALL FOOT ROWS: On first needle, K1, *P2, K2* Repeat ** across until you have three st remaining. P2, K1. Return first needle to rest position. Turn work. K all st. The ribbed st are the top of the foot, the stockingnet st (plain knitting) are the sole of the foot. Continue in this way until you are 2 inches from desired length. You can try the sock on at any time to check length.
BEGIN GUSSET
ROW 1 & ALL ODD GUSSET ROWS: On top of foot, continue to rib across. On sole of foot, K1, M1, K until you have 1 st remaining on sole needle, M1, K1.
ROW 2 & ALL EVEN GUSSET ROWS: On top of foot, continue to rib across. On sole of foot, K all st.
Repeat these rows until you have 54 (60, 66) st on sole needle. You will continue to have 32 st on top of foot needle, since you have not increased here.
REVERSE HEEL TURN
ROW 1: On top of foot, continue to rib across. You will not knit these st again until you have completed the HEEL FLAP. Just leave them on their needle until you begin the CUFF. On the sole of the foot, before you begin knitting, place the LAST 16 (18, 20) st on waste yarn. Knit 16 (18, 20) st. Place these st on waste yarn. K until you reach end waste yarn, turn work.
NOTE: You will need two markers for the REVERSE HEEL TURN. You can make them from scraps of a contrasting waste yarn. You will use one on each side as you work your incubus heel.
ROW 2: Slip first stitch (and every first stitch from this point on in HEEL), place marker (important because you do not want to work this stitch again until later). P until you reach waste yarn. Turn work.
ROW 3 & all odd rows: Slip first stitch, place marker (important because you do not want to knit this slipped stitch again until later) K to next marker. Turn work.
ROW 4 & all even rows:: Slip first stitch, move marker to this point, P to next marker. Turn work.
Continue these rows until you have 10 live stitches left on LH needle and are about to begin a K row.
HEEL FLAP
ROW 1: Slip first st, K9, (M1, K1) 5 (6,7) times, pick up first st off waste yarn onto left hand needle, pick up as if to M1, and SSK the M1 st and the first st from the waste yarn. Turn.
ROW 2: Slip first st (and every first stitch until you complete HEEL FLAP), P to first slipped st. M1, P1 5(6,7) times, pick up first st off waste yarn onto LH needle, pick up as if to M1, and P2tog. Turn. You should now have 32 (36,40) stitches on your needles, and 15 (17,19) stitches on each piece of waste yarn on either end of your live stitches.
ROW 3 & ALL ODD HEEL FLAP STITCHES: Slip first st, K1, sl1 across until you have 1 stitch left. Slip final stitch to right hand needle. Pick up one stitch from waste yarn with right hand needle. Slip these two st back to left hand needle and SSK. Turn.
ROW 4 & ALL EVEN HEEL FLAP STITCHES: Slip first st, P1 until one stitch remains. Slip stitch to RH needle. Pick up on st from waste yarn with RH needle. Slip both st to LH. P2tog. Turn.
CONTINUE 3 & 4 until you have picked up all stitches on waste yarn. You will now resume working in the round, and should have 64 (72,80) st.
ROW 5: S1, K1 across.
CUFF
ROW 1 & ALL CUFF ROWS: On first needle, K1, *P2, K2* Repeat ** across until you have three st remaining. P2, K1. Return st to rest position, and take up second needle. Repeat until you have knit 7 inches. If you want your sock cuff to be longer than this, increase 2 stitches evenly spaced around every 8 rows until you have reached desired length. Note: If it's knee socks your after, you will have to decrease again and add some elastic!
BIND OFF
PREFERED METHOD: Elizabeth Zimmerman’s Cast On Cast Off technique, or
Using one size bigger needle, K1, *P2, K1, M1, K1* Repeat ** until you have 1 st remaining, M1, K1 while simultaneously working bind off.
Note: Your Bind Off should be very loose.
FINISH.
Weave in ends.
Invisible 2x Cast On Technique
To execute this technique, you will need two circular needles of the same size. They do not have to be the same length or type, however. Some knitters have mentioned that they prefer mismatched needles because it makes it easier to avoid picking up the wrong one.
To begin, make a slip knot on one of the needles. Look at this knot and promise yourself you will not knit any of the loops associated with it.
%20of%20IMG_0013.jpg) Hold the end of your second needle parallel to the one holding the slip knot.
Hold the end of your second needle parallel to the one holding the slip knot.%20of%20IMG_0014.jpg) Begin wrapping the working end of your yarn in a figure 8 motion around the two needles. See next picture.
Begin wrapping the working end of your yarn in a figure 8 motion around the two needles. See next picture.%20of%20IMG_0015.jpg) Continue wrappping in a figure 8 motion until you have the total stitch count you need. Do not count the loop (s) of your slip knot, since you will not be knitting these.
Continue wrappping in a figure 8 motion until you have the total stitch count you need. Do not count the loop (s) of your slip knot, since you will not be knitting these.%20of%20IMG_0016.jpg)
%20of%20IMG_0017.jpg)
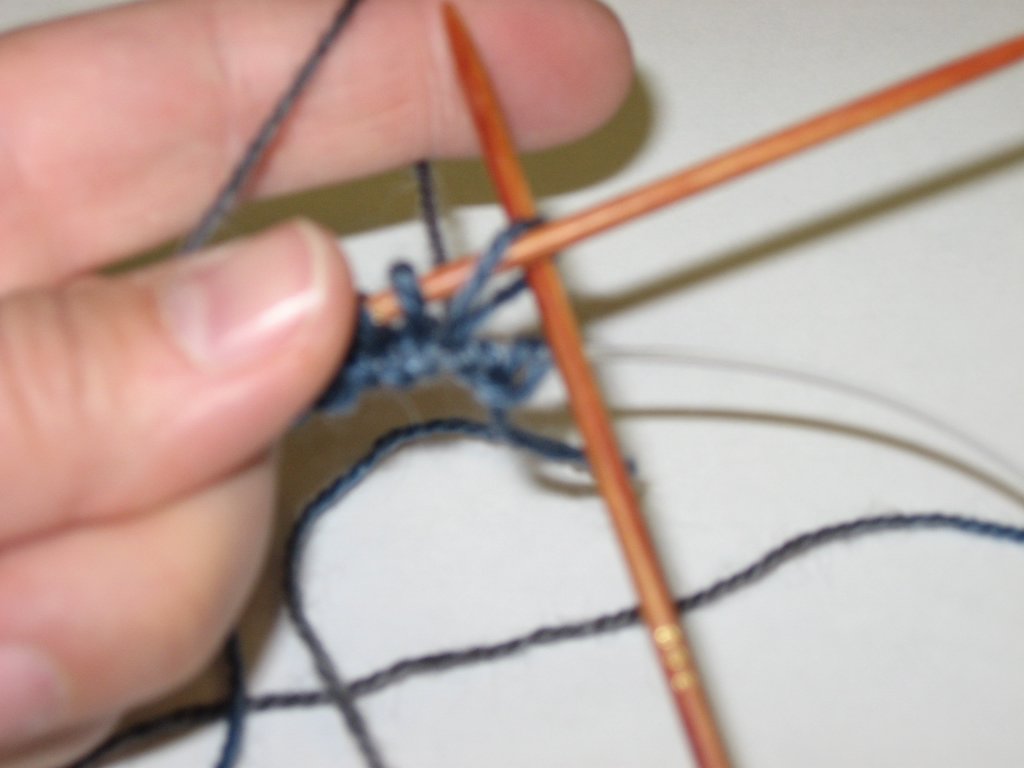
When you knit socks (or mittens or any other small tube) with two circular needles, you will work half your total stitches on each needle. The reason that this does not create a gap or a distorted stitch at the beginning / end of the needles is that while you are working on one needle, the stitches for your second needle are resting on the thinner cable of the circulars, rather than on the needle itself. Below is a photo of half the stitches ready to knit on the first needle and the other half on the cable.
%20of%20IMG_0019.jpg)
%20of%20IMG_0021.jpg)
Knit the needle with the slip knot first. Do not twist your stitches as you knit across. At this point your gauge will be terrible, your stitches will be all stretched out, and you will begin to doubt. Do not despair. After you have knit a few inches of the pattern, or even when you are completely done, you can tighten up the loose cast on stitches and they will look perfect.
 Slip the slip knot loops onto the needle without knitting them. Slide the stitches you have just knit to the cable. Turn and begin knitting second side of row with your second needle.
Every row in this technique consists of knitting all of the stitches on BOTH needles. It is helpful to place make a marker out of a loop of yarn and place it at the beginning of the row so that you have a reminder where the row begins and ends -- particularly if you are like me and knit on the fly. When you knit across the needle with the slip knot the second time, remove the slip knot from the needle -- you will not need it anymore! Now just continue in the pattern.
posted by firstknit at 11:35 AM
![]()

2 Comments:
oh, wool socks in August? I never leave home without them! - we were in the Yukon in the cold misty rain my little wool socks were feet savers!
I have just discovered this style of knitting socks and the next sock on the list will be yours. (my sweetie didn't have wool socks with him!) I love the idea of the cast on you show and can't wait to try it!
Suze in northern BC Canada
Hi, I found your pattern from a link on knitting pattern central, and I was wondering if you have instructions on how to do your invisible cast on? I saw the pictures at the bottom, but it seems to start with the stitches already on the needle, so I'm wondering what the first step is? Is it just a normal cast on but very loose? Or something else?
Post a Comment
<< Home